We all know how to hide files. There are many techniques to do it. Here I have listed 3 techniques of hiding the folder and files. This is a good comparison of the three techniques. Previously I had written an article to completely hide a file using command prompt. In the following table I have hyper-linked the same.
| Technique | Description | Security |
| Default way to hide files | Right click, go to properties and make it hidden | Very Low, because anybody can see your file by going to the folder option in window. |
| Disguised Technique | The files will be hidden inside an image | High, because nobody can recognize the files, present behind the image. |
| Hide completely by command prompt | The folder will be completely hidden | Very High, because nobody can see the files by any means |
Disguised Technique
Now we will see how to hide files by disguised technique. The term “disguised” has been given by me only. It is because we are going to hide files inside an image. A layman can see the image, he can even open the image and view it. But he can’t ever imagine that the image is hiding some files which are not visible. Just go through following steps.
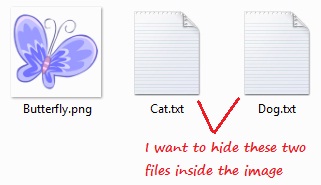
- To start doing this you have to be ready with two things. First is the files which you are going to hide and the second is the image, behind which you are going to hide the files.
- All these files and image should be present in the same folder.
- Now you have to make a .zip or .rar of those two files which you are going to hide. Just select those files, right click and make a .zip or .rar

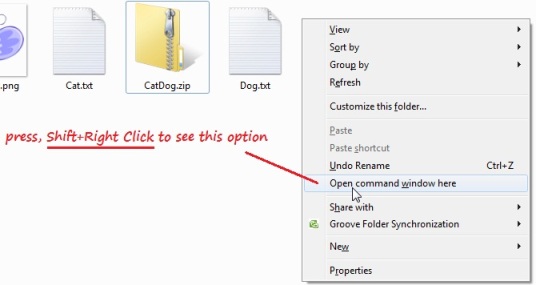
- Now open command prompt at the folder where all these files are present. To do so just press shift+right click in the folder and then click on Open Command Window here.
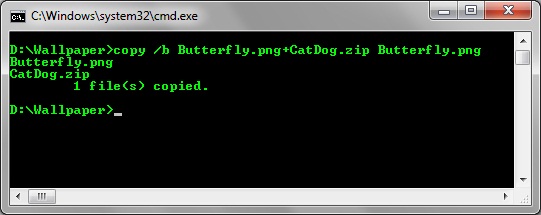
- In the command window type copy /b Butterfly.png+CatDog.zip Butterfly.png
- The meaning of above command is, we are adding two files and then storing the combined file in another file.
- Now you are done. The files are now hidden in the image.
- In the command I have mentioned my file names. You need to replace those file names with yours.
How to view the hidden files
- To view the hidden files, change the file extension of the image to .zip/.rar whichever you have done.
- For example in my case I have to change the Butterfly.png to Butterfly.zip
- Then right click on the image file and click on open archive/Open with WinRAR. You can view all the files that you have stored.
- To make it hidden again, just change the file extension of the image from .rar/.zip to .png/.jpg whichever is applicable to you.
- In my case I will change the Butterfly.zip to Butterfly.png


OMG!!!
what a cool trick…
really wonderful…gr8..