Creating individual meta tags for your individual posts is very very important for better Search Engine Optimization. You might have seen that when you search for something in search engines, they give you some search result links with some description under each link. Yes that is the content of meta tag. Search engines will find for a meta tag in your post to keep it as a description under the link. If you will not set the meta tag manually then search engines will set some default descriptions according to your content of the post. Many a times it is found that beginners in bloggers are not aware of creating a meta tag for their blogs. Let me tell you one good news here, within only 15 secs you can create meta tags for your post in new blogger interface. Here is an example of a meta tag for individual post.
For new Blogger interface
Follow these simple steps to include meta tag in your individual posts in blogger.
- Create a New Post.
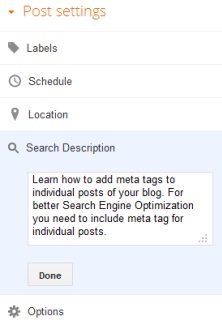
- Just right to the new-post editor you will find a vertical bar with heading “Post Settings” as shown in the figure.
- Now write the description of your post in the “Search Description” section and click “Done”.
- In the diagram I have shown you an example.
- This is an real life example. This Description is present in the meta tag of my current post.
- To verify it you can right click on this page to view the source.
- After viewing the source you can search for the sentence shown in the picture.
- After adding the meta tag you can immediately verify from your computer. But to be reflected in search engines it take 2-3 days because search engines need to crawl through all of your posts.
For old Blogger interface
In old blogger interface or for the templates other than blogger’s template you need to manually edit the html code to create the meta tag. Just do the following steps to create it.
Go to “Design”->”Edit HTML”. You will find an editor. Search for the string “<head>” or you can also search for the string “<head”. Because some times the head tag will be like “<head blah blah blah blah blah>”, so it is better to search for “<head”. Now put the following lines of code after <head> and before </head> tag.
<b:if cond='data:blog.url == "WRITE URL OF YOUR POST HERE"'>
<meta name="description" content="Learn how to create a blog"/>
</b:if>
NOTE: You need to replace the texts in bold with your own text according to your post. That means replace “WRITE URL OF YOUR POST HERE” with your post’s URL. Also replace “Learn how to create a blog” with your own meta tag content according to your post.
Let me explain the code. It states that if the URL is equal to the URL that you have specified then accept the meta tag. Now one question might be arising in your mind that you have not published the post yet then how can you get the URL of the post. Yes your question is a valid one. Don’t worry you will do all these tasks once your post is published. After publishing your post you will get URL of your post and now you can give it.
Hope you have liked the tutorial. If you really like it then share it to your friends from below.

